In the past, we have showed you how to use the Actor Framework to create highly modular and easily scalable applications in LabVIEW.
In this article, I’d like to share a few tips that have helped me when working with another popular framework in NI’s product line-up: TestStand.
TestStand? A framework?
That’s right. TestStand is not an IDE like LabVIEW (although it integrates with a number of them, including LabVIEW). Instead, TestStand provides a generic environment for developing test sequences that already includes many commonly useful default behaviors, such as execution flow control, error handling, report generation, etc., while allowing the user to override or extend this default behavior to meet application -specific requirements.

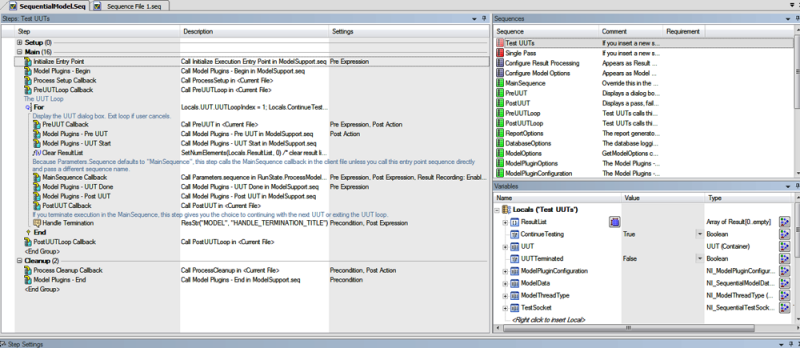
Figure 1 TestStand sequential process model, which handles all non-application-specific behavior in TestStand by default.
You can see how a lot of this sounds very similar to the following excerpt taken from Wikipedia’s entry for ‘Software framework’, which highlights a framework’s “key distinguishing features”:
Inversion of control – The program’s flow control is dictated by the framework, not the caller.
Extensibility – A framework can be extended by the user by selective overriding to provide specific functionality
Knowing this could help with understanding what TestStand’s intended use cases are, and, therefore, how to use the tools it provides more efficiently;, so consider this tip #1.
Keep your LabVIEW modules simple
One of the most common mistakes I see newcomers to TestStand make is trying to cram most of the test’s features and requirements in their LabVIEW modules. In my experience, this very often leads to a number of headaches when trying to expand the sequence’s functionality because of new requirements or simply as part of integrating parts of the sequence with other components.
When developing modules in LabVIEW to be used in a TestStand sequence, I like to follow these guidelines:
- Each module does one thing only – We’ve talked about the Single Responsibility Principle before. LabVIEW modules developed for TestStand sequences are not exception here and should follow this principle always. Doing so will improve readability of the sequence and will make it easier to re-use your modules in other parts of your sequence.
- Keep loops to a minimum – There are some valid cases for using loops within LabVIEW modules developed for TestStand sequences, like waiting for an instrument’s response after sending it a command for instance. For most other cases, my recommendation is to not include any FOR or WHILE loops in your LabVIEW code.

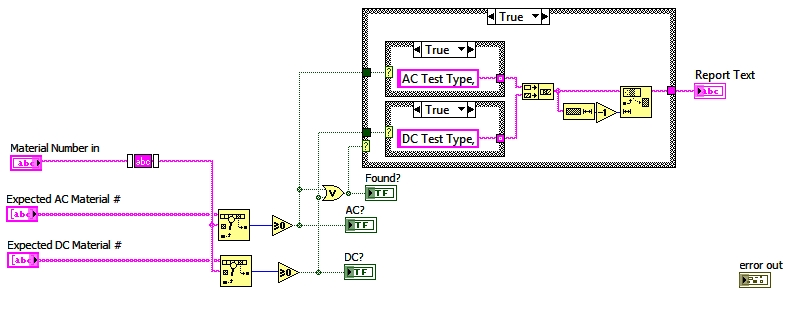
Figure 2 Simple VI's that perform a single task and execute only once are TestStand's idea of a perfect module
If there’s no option but to use a loop, make sure that you know when that VI is going to stop, either by executing your FOR loops a clearly defined maximum amount of times or implementing timeout logic when using a WHILE loop. Failure to do this means that TestStand can (and eventually will!) get stuck, waiting for ever for the return value of a VI that will never finish executing, forcing the user to terminate TestStand’s execution to continue.
Leverage TestStand
As LabVIEW developers, we are used to having to write most of the functionality we require for our application to work and this tends to carry over to our test sequence design. However, as we mentioned before, TestStand already includes a lot of common, useful features having to do with automating a test, so make sure you know them!
- Let TestStand evaluate your data – By utilizing TestStand’s ‘Numeric Limit Test’ and ‘String Value Test’ step types, you ensure that your measurements end up being displayed in the test report by default. Having this information available is much more useful for debugging than just having a Pass/Fail Boolean.
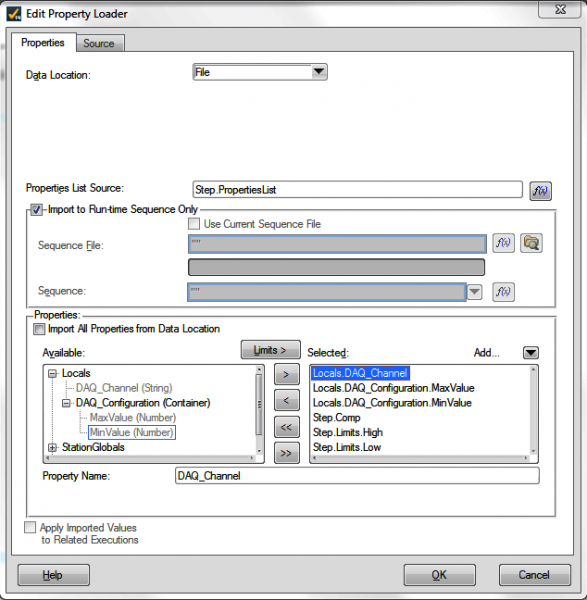
- Use the Property Loader to read configuration data – Another one of TestStand’s default step types, the property loader, allows you to read configuration files in several different formats such as CSV, Excel and tab delimited text files, and then map the values directly to your sequence’s variables. It even comes with a not-so-difficult-to-use configuration dialog.

Figure 3 Property Loader configuration interface
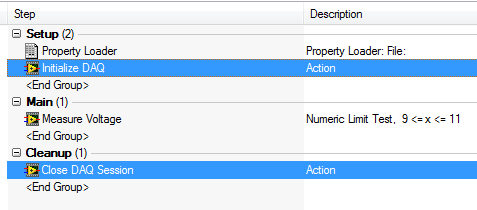
- If something MUST happen before the sequence is done executing, put it in ‘Cleanup’ – Each sequence is divided in 3 sections: Setup, Main and Cleanup. While Setup and Main exist mostly to make it easier to read a sequence, Cleanup serves a much more important function. Any step placed in Cleanup will always execute, even if the sequence execution is terminated. This allows you to make sure, for instance, that your unit under test always returns to its safe, idle state.

Figure 4 This sequence is not only easier to read, it's also safer!
Summary of Tips
#1. Manage execution flow control in TestStand and not LabVIEW
#2. Keep your LabVIEW VIs simple: single responsibility, keep loops to a minimum
#3. Leverage TestStand: let TestStand evaluate your data, use the Property Loader to read configuration data
#4. Put critical tasks in Cleanup section to ensure they execute
- rodrigor's blog
- Log in or register to post comments

Comments
You can also add the Sequence Context objet
Hi,
On every useful tip is also to add a Sequence Context control in every LV code module you can create. TS is sometimes very sensitive to module prototypes : using the sequence context inside your code will allow you to use the API to get a parameter that you might have forgotten at module design without changing your VI's prototype !
Cyril